Notes on Digital Modeling
 Conning tower of U.S.S. Cavalla (SS-244), as it appeared on her first war patrol in June 1944. In the 1950s Cavalla was refitted as a hunter-killer submarine (SSK), and in the process had her superstructure completely rebuilt, changing her external appearance permanently from what it was during World War II.
![]()
In the comments section of my recent posting with the digital model of the coastal steamship Harlan, a regular reader asked about the software I use and how I go about doing the modeling and renderings. In response to that, I’ll put down a few notes here that may give a little background to the process, at least how I fell into it. Don’t worry, this will not be a tutorial; I can’t stand to read those, either.
I should preface this by saying that the undercurrent that runs through all my history activities, of which I consider the modeling thing as one facet, is to convey whatever story or information to a wider and usually non-specialist audience– “public education” is the common term – and that influences the modeling somewhat. More on that in a bit.
The modeling software I’ve used for more than a decade is Rhinoceros, published by Robert McNeel & Associates. Rhino is not much used by hobbyists, but it works well for the sort of modeling I do, and (more important) was the first 3D package I used that I could actually figure out how to create something that turned out the way I wanted. (Like I said, I’m not good with tutorials.) Rhino is more commonly used in industry, particularly in marine engineering and naval architecture, in part because it’s optimized to interface well with various machine tools and digitizers. Many folks who create models in Rhino export them into other rendering software to create hyper-realistic images, but I usually use Rhino’s dedicated rendering application, Flamingo.
![]()
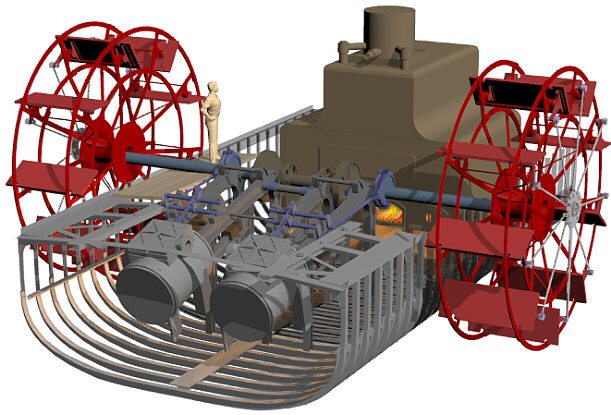 Model of the midships section of the blockade runner Denbigh, showing the engines, iron-framed paddlewheel, boiler and hull structure. Unlike most of my modeling projects, this one was based not on archival drawings, buton the aggregate data collected during three field seasons and hundreds of divers on the wreck site. Via Institute of Nautical Archaeology.
![]()
Some of my modeling has been done for specific projects or publications, a lot for fun, and some (like Harlan) for both. When I start a project, I compile all the images – photographs, scale drawings, whatever – that I can find to use as reference material. Inevitably some features on the model will be based on education guesswork, which is where experience and reference to similar subjects comes in handy. While I don’t have any detailed references on the arrangement of Harlan’s foredeck, for example, there’s lots of documentation of winches and other gear on similar vessels, so that can be reconstructed with a fair assurance that it’s representative of what was actually there.
In the case of Harlan, I had an excellent reference for the profile of the ship, showing its basic features, their position and proportions. I also had, from other sources, exact measurements of the ship – length, width, depth of hold, and so on. One critical thing I did not have (and that may not now exist), is a set of lines for the vessel, that precisely define the shape of the hull at regular intervals along its length. In the absence of that data, I used the lines of another iron-hulled vessel of that same general era, the 1877 Iron Barque Elissa, and scaled the dimensions of those lines to the known dimensions of Harlan. I reshaped the bow profile – gracefully curved on Elissa, straight and blade-like on Harlan – and made a few other small adjustments, and then used that shape for Harlan’s hull form. The result is an approximation, but probably close to what actually was there.
![]()
 Hull form of the 1877 Iron Barque Elissa (foreground), and as adapted for the model of Harlan (background).
![]()
Other modelers may use different techniques, but some sort of “fudging” or guesswork is often necessary with 3D modeling. To produce a flat painting or drawing of a vessel or other object doesn’t necessarily require precision when it comes to complex shapes, but a digital model exists in three-dimensional space, so the modeler has to have something there. I’ve known lots of folks who’d say, “you don’t have the lines for that ship, so anything you put there is by definition incorrect, so you shouldn’t do it.” I understand that point, but I disagree with it, because I believe that the instructional value of an imperfect reconstruction, based on best evidence currently available, greatly outweighs the instructional value of a blank page. YMMV.
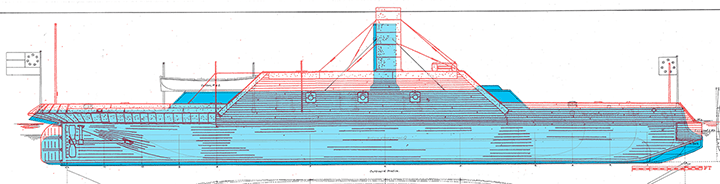
But getting back to using existing drawings, there’s a surprising amount of material available from different sources. Modern reconstructions are really dicey, though, because each draftsman ends up making assumptions and speculations that end up on the page, that may or may not be correct. To cite one example, I have reconstructed drawings done of the Confederate ironclad Arkansas by W. E. Geoghagan, a maritime history specialist working with Howard I. Chapelle at the Smithsonian Institution in the 1950s and ‘60s, and by David Meagher, a more recent researcher who’s compiled an impressive listing of reconstructed Civil War ironclads. Both men do fantastic work, but when you compare the two reconstructions, one over the other (Geoghagen in blue shading,, Meagher in red outline), it’s almost like they’re drawing two completely different ships:

![]()
Which one I think is more accurate, and why, is a subject for another time. But suffice to say that (1) any reconstructed reference drawing embodies its own speculative elements added by the draftsman, and (2) you can make yourself crazy trying to figure out which set of contradictory sources to use or, more likely, how to combine them to create something in-between.
Anyway, good drawings from whatever source are central to my modeling process. Rhino and other modeling packages allow the user to drop images into the background of the workspace, so if you take time at the beginning to carefully align and scale those drawings, they serve as a template that you can draw directly over. This both accelerates the speed of the work and improves accuracy, insofar as the reference material itself is accurate.
![]()
 Rhino workspace view of the model of U.S.S. Monitor. Note the upper left, lower left and lower right panes each have scale drawings of the ship, by Alan B. Chesley, for reference in modeling the ship.
 Closeup of the lower right workspace pane, showing the use of Chesley’s profile as a reference. Different layers on the model are shown in different colors.
![]()
The software allows the user to group elements of the model together in “layers” that can be turned on or off, as needed. For clarity, the user assigns these different colors. Lots of models get very complex, very quickly, so it’s useful to be able to turn off layers that you’re not working on at a given moment. This is also useful for showing different aspects of the completed model. The Hunley model, for example, includes the spar torpedo in two different position, hoisted clear of the water and lowered in its deployed position; you just have to be careful to turn the two layers on and off alternately, to depict the boat in the appropriate configuration.
![]()
 Workspace view of C.S.S. Virginia (above) and C.S.S. Richmond (below), showing on Virginia the different layers of the model, grouped by color.
![]()
I also use a lot of ancillary software that are critical. I occasionally use Poser for figures (human or animal), and Photoshop constantly for developing textures and well as “post-production” work on the rendered model. Texture are images files (usually JPGs) that are projected onto the model to give it color and, um, texture. Applying a good texture – in this case, a photo of a brick wall — will make a simple plane into a substantial piece of masonry:
![]()
 Two simple planes, the one on the right textured as a brick wall.
![]()
Finally, some images get a lot of “post” work after rendering, usually in Photoshop, to add elements that either the rendering software can’t do, or I don’t know how to do. For example, here’s a sequence with the Hunley model that takes it from an aseptic, obviously-a-model environment, and builds around it something that hopefully presents a more realistic depiction of how the boat might have appeared in real life:
 1. Background color.
 2. Added light from surface.
 3. Added light shafts for image background.
 4. Added rendered model of boat and spar torpedo.
 5. Added reflection of boat on underside of water surface.
 6. Added light shafts in foreground, and the image is done.
![]()
Digital modeling has some advantages over building a physical model. Repetitive details (e.g., cannons or rail stanchions) can be exactly duplicated, over and over again, almost instantly. And if changes are needed, those can be accomplished much more readily with a digital model than a physical one. One reason I wanted to do Harlan is because she was of the same design as U.S.S. Hatteras, that I modeled some months ago; the Harlan digital model is currently being revised into a new and (I believe) more accurate rendering of Hatteras.
![]()
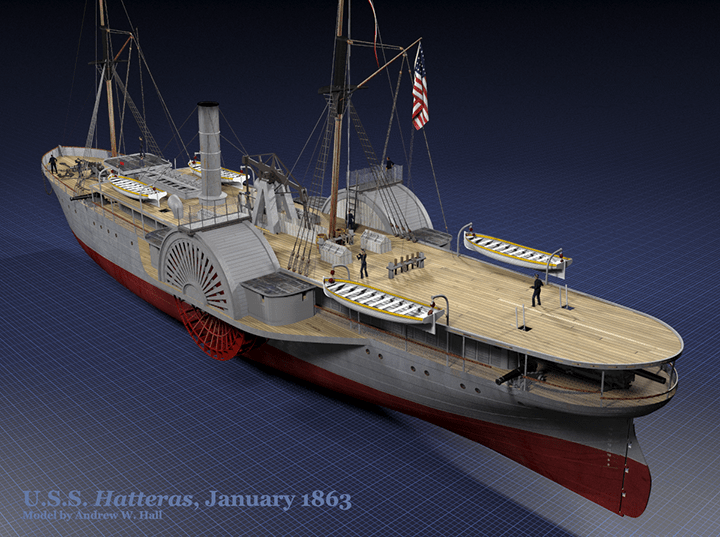
The updated Hatteras model.
![]()
Even so, digital models still lack the real beauty and style of a well-done physical model. It’s an aesthetic consideration, but it makes all the difference in the world. So now, go look at some real steamboat models by a real artisan, Rex Stewart.
___________


leave a comment